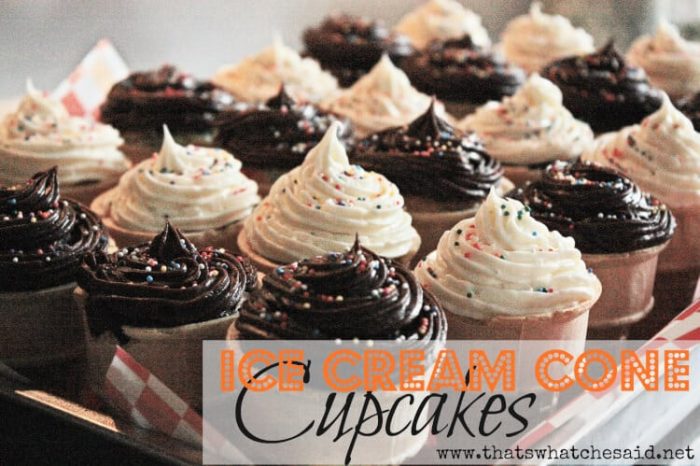
I wanted something a bit out of the ordinary for the cake choice at Ryan’s Teddy Bear Picnic Birthday Party. I decided on these adorable Ice Cream Cone Cupcakes!
I followed the directions on the side of the ice cream cone box. <–Yep, real original, lol!
How to Make Ice Cream Cone Cupcakes:
Preheat oven to 350 degrees.
Prepare cake batter as directed on the box. Yes, I said the box. I take shortcuts whenever I can get them these days!
I then filled the cones up 3/4 way full. I used the entire bowl of batter for 24 cones. I made a box of chocolate and a box of funfetti.
I baked for about 25 minutes. I let the cones completely cool and then iced with white and fudge icing.
Since I was only doing cupcakes with no actual ice cream, I decided to give options so we had chocolate cake with fudge icing, chocolate cake with white icing, funfetti cake with fudge icing and funfetti cake with white icing.
I used a gallon Ziploc back with 2 containers of each flavor of store bought frosting. Yes, I said store bought.
I inserted a large star icing tip in the bag, clipped the corner, filled with icing and piped onto the cupcakes in two layers so it would stack up and look like ice cream.
Topped with sprinkles, I think they looked pretty darn cute! Not to mention tasty.
*These are not something you can make the day ahead. The cones get soggy and the tops of the cones bend over from the weight of the cake and icing the next day. I made them the day of, but we had extras and the next day they were not cute at all! :) So this is definitely a same day recipe!
Need any more cupcake ideas? How about some Mickey Mouse Cupcakes or even better…Surprise Strawberry Cupcakes with Cheesecake Frosting! Yum!


Comments & Reviews
Stephanie says
They look tasty!
Rufus' Food and Spirits Guide says
Nifty and you’re not trashing paper liners!
Che Says Cheryl says
Exactly! We didn’t have cake plates, cupcake liners, or even plastic silverwear…we ate everything except the napkin!
Casey says
These look adorable!
Che Says Cheryl says
Thanks Casey! They turned out better than I even hoped and they tasted delicious also! I also didn’t realize how easy they were. Now I am intrigued to find some different combinations. Maybe carrot cake with cream cheese frosting?
keepsmeoutofmischief says
They look fantastic! Did the cones survive the oven? I’ve seen loads of recipes that say you need to cover the cones with foil while they’re in the oven. That seems like wayyyyyyy to much work for my liking!
Che Says Cheryl says
The cones did perfect in the oven. I think that is why they recommend baking at 350. I think that is still low enough not to scorch the cones! I agree that covering with foil sounds tedious! I was more worried about them toppling over but once filled they were really stable. These were super easy and no cupcake liners, cake plates or forks needed!
Sheryl says
This looks so good. Please come over to my link party and share some of your tasty recipes with us at Cast Party Wednesday. http://www.ladybehindthecurtain.com
Thanks,
I hope to see you there!
Cheryl says
Thank you for the Invite! I enjoyed browsing all those great recipes!
maggie says
omg this is fantastic for the kids coming over this weekend.
Would luv for our readers to discover this.
please add it to our linking party here
http://www.passionatelyartistic.com/2011/06/beautiful-furniture-redo-pop-up-cards.html
Have a great week,
Maggie
http://passionatelyartistic.com
Cheryl says
Thanks for the invitation! I linked up and browsed around! :)
Sheryl says
Thanks for sharing your yummy recipes with us at Cast Party Wednesday. I hope you come back and visit us tomorrow.
Thanks again.
I hope to see you there!
Mika(Photoadik) says
That’s pretty! Love the idea and I love the sweet treats :)
dena says
This would be a great idea for the picnic theme of my daughter’s bridal shower … no trashed cupcake liners to haul away! Thanks for the great idea!
Jamie says
Mmmmm!!! If you get a chance I would love you to link your ice cream cone cupcakes up to More the Merrier Monday. It starts tonight and lasts through Wednesday. See you there. http://diyhshp.blogspot.com/
audra says
these look so yummy and cute! I’d love for you to link up at my Tuesday Tutorials Link Party! :)
http://www.thekurtzcorner.com/2011/08/tuesday-tutorials-link-party-1.html
Kellie@My So Called Green Life says
I’ve heard about these but never understood quite how to do it. Thanks for sharing. I’ll definitely be trying them in the future.
Cheryl says
Thanks for stopping by Kellie! I hope you love them! :) They are as good as they are cute!
Ashley says
These look yummy!! Thanks for linking up to Craft and Tell!!
Cheryl says
Thanks for the invite Ashley!
Erica @ Doodles and Doilies says
I need to try these. Thanks for the tips on how to make them not soggy. And thanks for linking up to my Delight Me party.