Cutting Heat Transfer on a Cricut is easier than you think! A few simple steps and tips on how to cut iron-on with Cricut and you will be on your way to a fun shirt, cute tote, or more!
My favorite heat transfer projects have to be T-shirts and Onesies! Here are some of my favorites!
If you are new to Cricut I recommend reading my Getting Started with Your Cricut Post.
If you need help uploading an SVG file into Design Space you can find my video and tutorial here.
Follow me on YouTube for more Cricut & Craft videos!
Iron-On Vs. Heat Transfer Vinyl
What is the difference between these two terms? Nothing! Iron-on vinyl IS Heat transfer vinyl (htv) and vice versa!! Just two different ways to describe a vinyl that is adhered to your blank (most times fabric) using heat!
If you would like to go into a bit more detail, I encourage you to check out this Iron-on 101 – Heat Transfer Basics post! I explain things in a bit more detail including different types of iron-on and tools to press the iron-on. Today I am teaching you how to cut iron-on with Cricut Design Space and a Cricut Machine.
How to Cut Iron-On Heat Transfer Vinyl on a Cricut
Instructions on how to cut iron-on vinyl heat transfer vinyl using a Cricut Machine. This tutorial will cover all machines including the Cricut Joy, Cricut Explore Air/Air2/Air 3, and the Cricut Maker/Maker 3 cutting machines.
- Select Machine in Design Space
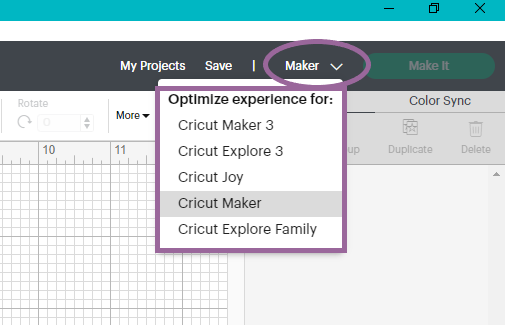
Open Cricut Design Space. Select a New project canvas. In the upper right corner, click the dropdown arrow and select from the family of machines the machine you are cutting heat transfer vinyl with today.
- Add the design
Use a design from Cricut Access, create a new design using the Design Space tools, or Upload an SVG to Cricut Design Space.
Size your design accordingly and when ready, click the green “Make It” button in the upper right-hand corner of Design Space.
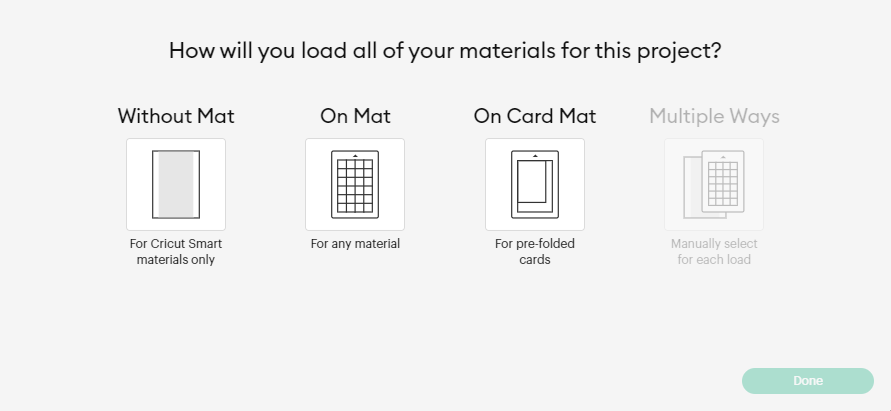
**If using a Cricut Joy, Cricut Explore Air 3, or Cricut Maker 3: you will get a pop-up asking How you will load the materials. Select the option that is appropriate for your project and then click “Done“. (Cricut Joy example image below)
- MIRROR the design
After clicking “Make It” you will see the Mat Screen. There should be a mat for every color of the material you are using.
Select the radio button in order to Mirror your Design. All Iron-on projects MUST be mirrored in order to apply correctly to your projects. If you have more than one color please note you need to MIRROR on all the mats. (Find out more about why we have to mirror here)
Click Continue. - Set the Material
If using a Cricut Joy: A list of custom materials will display and you can search and select your material from that list.
If using a Cricut Explore Air/Air 2: Turn the knob on your machine to Iron-on for Cricut everyday iron-on or smooth iron-on. Select Custom on the dial if using flocked iron-on, glitter iron-on or specialty iron-on. A list of custom materials will display and you can search and select your material from that list.
If using a Cricut Maker, Cricut Maker 3, or Cricut Explore Air 3: A list of custom materials will display and you can search and select your material. - Prepare the Mat(s)
Iron-on has 2 sides. One side has a plastic carrier sheet, the other side is a matte side, often the same color as the color your iron-on should be.
Apply the Iron-on to the mat with the shiny side DOWN. - Load Mat(s) into Cutting Machine
If using a Cricut Joy:
If using a Cricut Explore Air/Air 2/Air 3: Press the flashing arrow button to load the mat.
If using a Cricut Maker/Maker 3: Press the flashing arrow button to load the mat. - Start Cutting
If using a Cricut Joy:
If using a Cricut Explore Air/Air 2/Air 3: Press the flashing “C” button to begin cutting.
If using a Cricut Maker/Maker 3: Press the flashing “C” button to begin cutting. - Verify Tool
Be sure you have the fine point blade inserted into the cutting machine carriage. The fine tip blade for the joy has its own special-sized blade. In all other machines, the blade is interchangeable.
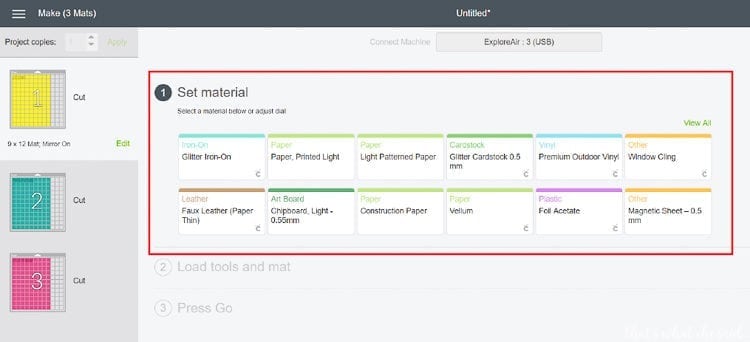
If you select Custom you will get a screen like this in Design Space that will let you choose your material. If you don’t see it right away, click the “view all” in the right top-ish corner of the red box I used to indicate the different settings.

Once the design is finished cutting you can remove your mat and you have successfully cut iron-on using your Cricut!
Next read on to see How to Apply Heat Transfer Vinyl. Get all my tips and tricks and the best practices so that it sticks evenly and correctly the first try as well as using an iron vs. heat press vs an Cricut EasyPress
More posts you may like:


Comments & Reviews
Stacie says
Hi! Is there anything you can put on the back if you aren’t ironing it on immediately? Thanks for the tips–I haven’t cut HTV yet.
Cheryl Spangenberg says
Great question Stacie! I guess it depends on how long you mean? If I am cutting things for the week I just leave it as is. You can actually stack designs on top of one another and still separate. If I need to mail the decal I will put some parchment or wax paper on the back of it! I hope that helps! HTV is my favorite thing ever!
Martha says
If I accidentally cut out my iron on vinyl on a poster board setting adn cut it all the way through, can I still iron it on and peel off the plastic?
Cheryl Spangenberg says
Yes, you can, Martha! Just use care when removing the carrier sheet not to pull the iron on also!
Terry L Robinson says
I am new to using Cricut and this was one of the best explanations for instructions that I have read so far!
Cheryl Spangenberg says
Terry, thank you so much for the wonderful feedback! I really want to be precise and informative! I am so happy I could help!